Posted: 23 Feb 2005
Welcome to BrainStorm Cool Tips. New tips will be posted regularly to help
you more effectively use Novell Linux Desktop. If you have any suggestions for
tips, please feel free to let us know by emailing http://www.novell.com/coolsolutions/feature/tips@brainstorminc.com.
Minimize your maximizingResizing, minimizing, and maximizing again can
get old pretty quickly especially when you have over 10 programs open and are
working on five different projects. In the real world of multi-tasking and messy
desktops, it's nice to know that as a Novell Linux Desktop user, you can be
inherently more organized simply by using workspaces.
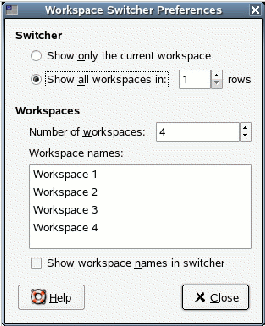
Setting upBy default, NLD has four workspace areas. These are located
in the applet in the lower right-hand corner of your screen. (If you can't see
your workspace switcher applet, right-click the bottom panel and select Add to
Panel -> Utility -> Workspace Switcher.) You can change the number of
workspaces available and how they are set up by doing the following:
- Right-click on the workspace switcher applet in the lower right-hand
corner of your desktop.
- Click Preferences.

- Choose Show only the current workspace to only show your current
workspace in the switcher.
- Choose the number of rows in which you wish to display your workspaces.
- Choose the number of workspaces you want to use.
- Click twice on the names of the workspaces in the Workspace names
box to change the names of your workspaces.
- Check the Show workspace names in switcher box to display the
workspace names in the applet instead of the visual representations of the
workspace.
- Click Close to apply your preferences.
Using the WorkspacesOnce you set up your workspace switcher, you can
begin to add windows to your different workspaces, drag windows from one
workspace to another, or view a window on all workspaces--all to help keep you
organized. Follow the tips below to organize your workspaces.
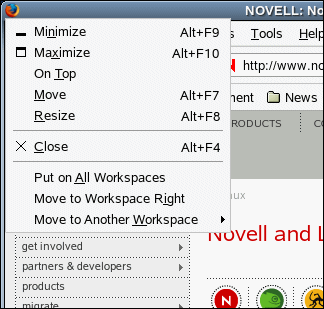
- Right-click anywhere on the window title bar or left-click the icon in the
top left-hand corner of a window to display the window menu.

- Click Put on All Workspaces to keep a copy of this window on all
workspaces.
- Click Move to Workspace Right to move the window to the next
workspace to the right in your switcher.
- Click Move to Workspace Left to move the window to the next
workspace to the left in your switcher.
- f you have more than one row of workspaces, you can click Move to
Workspace Down or Up to move to the next workspace up or down in
your switcher.
- Click Move to Another Workspace and choose a workspace listed in
the resulting menu to move the window to a particular workspace.
The
workspace with the highlighted background is the current workspace displayed,
and the highlighted window in that workspace is the active window. You can use
the window representations in the switcher to manage your workstations:
- To switch workspaces, click the workspace you want to view.

- Click and drag a window representation in the workspace switcher applet to
drag it to another workspace.
- To make a particular window active when you switch workspaces, click the
window's representation. When you switch workspaces, the window will be
active.
- When you reposition a window that is displayed in all workspaces within
one workspace, its position will change in all workspaces.
- All the windows open in all workspaces will display as minimized programs
along the bottom panel, regardless of which workspace is visible. You can
display any of these windows in your current workspace simply by clicking on
the program. The window will automatically move from its previously assigned
workspace to the one you are currently in.
- When you click the show desktop button to the left of the workspace
switcher, only the windows in the current workspace will be minimized.
ConclusionWith the increased organization workspaces provide, you don't
need to worry about minimizing, maximizing, and resizing to switch tasks. In
fact, you'll be so organized that you'll wish you could have a few more physical
workspaces. Just don't start sawing away at your desk without permission.
|