| Integrating Novell OES Linux iManager, Virtual Office and Welcome Page with Apache 2.2.2, Tomcat 5.5.17 and Sun Java2 1.4.2 
By Jonathan Peck
Introduction
This document is a guideline for a basic install of Apache's web server
version 2.2.2 and the Tomcat java servlet version 5.5.17 and integrating it with
your current OES Linux setup. A proof of concept and feasibility test that the
latest Apache and Tomcat versions would integrate with iManager, Virtual Office,
and Remote Manager was required before implementation on production servers.
This article assumes that you already have a good understanding of the Linux
operating system, command structure and are comfortable moving about inside the
environment. If you are not, it is suggested that you obtain assistance during
the install or stop and review Linux system administration.
Standard Disclaimer
(The lawyers made me do it!)?No liability for the contents of this document
can be accepted. Use of the concepts, examples, and all other content is
conducted at your own risk. As this is a new edition of this document, there may
be errors, inaccuracies, or other configurations that might not be suited for
your environment and could lead to damaging or corrupting parts of, or all of,
your system. It is highly suggested that you proceed with caution and review
this document carefully before implementing your setup. Although it is highly
unlikely that you will experience problems to the degree where your system is
damaged, I do not accept responsibility incase of occurrence.
All copyrights are held by their respective owners, unless specifically noted
otherwise. Use of a term in this document should not be regarded as affecting
the validity of any trademark or service mark. Naming of particular products or
brands should not be seen as endorsements.
Opinions, Narratives, Flames, Comments and Suggestions
The greatest thing about Linux is its ability to be customized. There is more
than one-way to accomplish your desired result and many opinions abound about
how to accomplish said result. Although being an avid fan and proponent of
Linux, as well as having worked with it since late 2000, no claims of being a
guru or expert are made, rather I enjoy Linux for the sake of the fact that it
allows me to experiment and learn about computers. I heartily welcome comments
and suggestions as well as opinions.
Nitty-Gritty
An out of the box installation of Novell OES SP2 generally includes Apache
2.0.49, Tomcat 4.1.31 and Sun Java2 1.4.2. As further enhancements are made and
new features are developed you might find yourself in a position where you
desire to install the latest Apache web server and Tomcat servlet container. I
found myself in that very situation when it was requested to develop a proof of
concept and feasibility test to find out if the latest Apache and Tomcat
versions would successfully integrate with iManager, Virtual Office, and Remote
Manager utilizing the company's current OES settings.
First things first is to download Apache 2.2.2:
http://httpd.apache.org/download.cgi
Pick the httpd-2.2.2.tar.gz (or bz2 depending on preference of compression
tool) and download it to your home directory.
Do the same thing for Tomcat by downloading version 5.5.17 and the Tomcat
connectors from:
http://tomcat.apache.org/download-55.cgi
Under the "Binary Distributions" you will see several sections such as Core,
Developer, Embedded etc. Choose the tar.gz file under "Core" and download it to
your home directory.
http://tomcat.apache.org/download-connectors.cgi
Under the "KEYS" section download the Source JK 1.2.15 Source Release tar.gz
file to your home directory.
I chose not to upgrade for several reasons. The first being since this was a
proof of concept I wanted to control the test right from the start. Making
modifications to the existing Apache configuration could have complicated the
process by introducing unwanted elements such as broken symbolic links and/or
module errors. The other being, and this is a personal preference, I am not
particularly fond of the default Apache 2.0.49 and Tomcat 4.1.31 configuration
in OES. Here is why:
Too many directory locations.
| Location of Apache 2.0.49 Files |
Location of Tomcat 4.1.31 Files |
| /etc/apache2 |
/etc/opt/novell/tomcat4 |
| /etc/opt/novell/httpd |
/opt/novell/tomcat4 |
| /etc/sysconfig/apache2 |
/var/opt/novell/tomcat4 |
| /usr/include/apache2 |
|
Before the flames start on why or why not that is a superior set up, I can
only say that some people like the modular approach to Apache with multiple
locations and configuration files, however I do not. I prefer what I consider a
more streamlined approach of one-control directory. I also find it is easier for
another administrator to come in behind me and have an easier learning curve of
how the system is configured.
Installation
Apache 2.2.2
*Note* When building from source files some administrators like to
work out of the /usr/local/src directory. They can keep track of files that have
been built from source and installed to the server. From the standpoint of the
author I chose to install and compile from within my home directory since this
was a test box and would ultimately be re-imaged. Generally I prefer to use
/usr/local/src.
The first thing to do is to perform the checksum on your Apache download.
Next to each file is posted the MD5 sum link that provides the checksum. You
want to compare to make sure your file is not corrupted nor was injected with
anything during download. Open up a console and if you are not already root
become so now by issuing the command: # su
Enter root's password and then navigate to the directory where you downloaded
your Apache file.
Then issue: # md5sum httpd-2.2.2.tar.gz
Upon hitting enter you should be presented with the checksum of:
a0d9f7f6f70110a5965340eb7f3a3e66 httpd-2.2.2.tar.gz
If your numbers don't match download the file again.
Next we need to expand the file for access: # tar -zxvf httpd-2.2.2.tar.gz
The -v flag is not necessary, however by personal preference I like to see
things verbose. Once it has completed extracting the file, change into the httpd
directory. We will now compile Apache for our system. I chose to install Apache
into /usr/local/apache2. Again this is just a preference. You can build
your directory wherever you would like by substituting your location for mine.
Be careful that your directory exists before compiling. Apache will not create
the directory; rather it will just dump its content in the parent. The compiling
and install time will vary depending on the power of your processor and
available memory. Expect 1-3 minutes. Execute the following commands to build
Apache. # mkdir /usr/local/apache2 <- my directory had not been created yet
# cd httpd-2.2.2 <- change into the expanded directory
# ./configure --prefix=/usr/local/apache2 <- configures apache
# make <- compiles
# make install <- installs
# make clean <- post install clean up (optional. but good habit)
Congratulations! Apache is now installed on your system. Now it's time to
install Tomcat.
Tomcat 5.5.17
Just as we did with Apache we want to make certain we have a good copy of
Tomcat. Run the md5sum command against the compressed file to compare checksum
numbers. # md5sum apache-tomcat-5.5.17.tar.gz
Upon hitting enter you should be presented with the checksum of:
994d39c0d2f462c79288e0249991dd49 *apache-tomcat-5.5.17.tar.gz
If your numbers don't match download the file again.
Next we need to expand the file for access: # tar -zxvf apache-tomcat-5.5.17.tar.gz
Again, the -v flag is not necessary, just a preference. The nice thing about
the core binary file is that you do not have to compile and build anything. Once
you have extracted the file move the directory from your home to a directory of
choice. Again, I chose to install into /usr/local/. For simplicity I
called my directory tomcat5 instead of making symbolic links to just "tomcat"
because I still have tomcat4 installed on the server and wanted to distinguish
between the two of them. Your server environment may differ and you might want
to use symbolic links instead. # mv apache-tomcat-5.5.17/ /usr/local/tomcat5
Your Tomcat files are now located in /usr/local/tomcat5. Next up is to
compile the Tomcat/Jakarta connector for the new Apache.
Tomcat 5.5.17 Connector
Here Apache.org throws a curve ball. They don't issue a MD5 checksum. They
instead have given a PGP signature. To check the validity of the signature you
will need to create the asc file. When you click on the PGP link it will present
you with the signature. Copy the text and write it out to a text file in the
same directory where your downloaded the connector file. Name it
jakarta-tomcat-connectors-1.2.15-src.tar.gz.asc. Once you have done that
issue the command: # gpg --verify jakarta-tomcat-connectors-1.2.15-src.tar.gz.asc jakarta-tomcat-connectors-1.2.15-src.tar.gz
Once you are satisfied that the file is good, the formula is very similar to
the installation of Apache. Since we are only going to build the Apache module
we don't need to worry about creating a new directory.
Expand the file for access: # tar -zxvf jakarta-tomcat-connectors-1.2.15-src.tar.gz
Once it has expanded we need to change down into the native directory
and compile the Jakarta module for Apache. Following the commands below will
build the appropriate module. # cd jakarta-tomcat-connectors-1.2.15-src/jk/native <- change into the native directory
# ./buildconf.sh <- configures libtool (for developers or if you have a custom libtool setup)
# ./configures --with-apxs=/usr/local/apache2/bin/apxs <- compiles the connector
# make install <- installs
# make clean <- post install clean up
The connector will be built and written as a file called mod_jk.so
into the directory <CONNECTOR_HOME>/jk/native/apache2.0. All that
is left is to copy mod_jk.so into your modules directory of apache:
/usr/local/apache2/modules. # cp <CONNECTOR_HOME>/jk/native/apache2.0 /usr/local/apache2/modules
Congratulations! You have completed the install of Tomcat 5.5.17. Let's move
on to the configuration of it all.
Configuration - Apache 2.2.2
The configuration of the two software components and building the necessary
configuration files is a bit more time consuming. My drink of choice for a quick
jolt of caffeine is RC Cola. The RC stands for Royal Crown for those of you who
aren't from the south. Sweet nectar. Anyways, now is a good time to grab you a
jolt of caffeine as we set off to configure the new setup.
httpd.conf
If you are familiar with Apache you know that it reads its settings from the
configuration file httpd.conf. There are two methods to implementing httpd. One
is modular and the other is monolithic. Just as in use of Linux distributions
everyone's opinion differs as to which way is superior and why. I tend to lean
towards making a hybrid of the two. I prefer one main Apache config file for the
major components of the web server (main server settings, root directory,
cgi-bin, modules etc?) and then use add-in conf files for specific tweaks such
as aliases. That is the method we'll employ for getting Apache and Tomcat to
work in harmony with each other as well as interacting with iManager, Virtual
Office and Remote Manager.
Using your favorite text editor open
/usr/local/apache2/conf/httpd.conf. I have truncated the conf file to
give you a general idea of the location of each line that needs to be modified.
Locate each line that is listed below and make the following changes, adjusting
your settings to your server environment. Items in bold are the lines you
are looking to manipulate and that which is listed between { } are items
specific to your server environment. # ServerRoot: The top of the directory tree under which the server's
# configuration, error, and log files are kept.
ServerRoot "/usr/local/apache2"
# Listen: Allows you to bind Apache to specific IP addresses and/or
# ports, instead of the default. See also the <VirtualHost>
# directive.
-------------------------------------------------------------------------------------------
Listen {IP address of your server}:80
# Dynamic Shared Object (DSO) Support
# To be able to use the functionality of a module which was built as a DSO you
# have to place corresponding `LoadModule' lines at this location so the
# directives contained in it are actually available _before_ they are used.
LoadModule jk_module modules/mod_jk.so
-------------------------------------------------------------------------------------------
# ServerAdmin: Your address, where problems with the server should be
# e-mailed. This address appears on some server-generated pages, such
# as error documents. e.g. admin@your-domain.com
ServerAdmin {administrator's email}@{domain}
-------------------------------------------------------------------------------------------
# ServerName gives the name and port that the server uses to identify itself.
# This can often be determined automatically, but we recommend you specify
# it explicitly to prevent problems during startup.
ServerName {IP address of your server}:80
-------------------------------------------------------------------------------------------
# DocumentRoot: The directory out of which you will serve your
# documents. By default, all requests are taken from this directory, but
# symbolic links and aliases may be used to point to other locations.
DocumentRoot "/usr/local/apache2/htdocs"
-------------------------------------------------------------------------------------------
# This should be changed to whatever you set DocumentRoot to.
#
<Directory "/usr/local/apache2/htdocs">
--------------------------------------------------------------------------------------------
# ScriptAlias: This controls which directories contain server scripts.
# The same rules about trailing "/" apply to ScriptAlias directives as to Alias.
ScriptAlias /cgi-bin/ "/usr/local/apache2/cgi-bin/"
--------------------------------------------------------------------------------------------
# "/usr/local/apache2/cgi-bin" should be changed to wherever your ScriptAliased
# CGI directory exists, if you have that configured.
<Directory "/usr/local/apache2/cgi-bin">
--------------------------------------------------------------------------------------------
# Supplemental configuration
#
# The configuration files in the conf/extra/ directory can be
# included to add extra features or to modify the default configuration of
# the server, or you may simply copy their contents here and change as
# necessary.
Include conf/mod_jk.conf
Include conf/welcome-Apache.conf
Include conf/nps-Apache.conf
Include conf/vo-Apache.conf
Save the file back to /usr/local/apache2/conf/httpd.conf. You may have
noticed at the end we added some include lines with 4 more "confs". These
are the alias redirects and the Jakarta module property files. They need to be
created and saved in /usr/local/apache2/conf/ for Apache to reference.
Again utilizing your text editor create the following files:
mod_jk.conf
The mod_jk.conf file sets parameters for the Jakarta module you compiled
earlier. It sets where to find the workers.properties file (you will create this
later in the Tomcat configuration section), a log file and what level of output
should be written to the log file. # mod_jk.conf
# Set required file locations
JkWorkersFile "/usr/local/apache2/conf/workers.properties"
JkLogFile "/usr/local/apache2/logs/mod_jk.log"
JkLogLevel error
welcome-Apache.conf
This conf file creates the alias redirect for the Novell Welcome Page that is
included in an OES distribution. The welcome page gives you a general overview
of OES and its capabilities. Although not necessary it is good practice for
configuration purposes. (Boy that last sentence sound academic doesn't it?) # welcome-Apache.conf
# Please include this file in the Apache httpd.conf file
JkMount /welcome/*.jsp ajp13
JkMount /welcome/WelcomePage ajp13
JkMount /welcome/LoginPage ajp13
JkMount /welcome/Header ajp13
Alias /welcome "/usr/local/tomcat5/webapps/welcome"
# In general, allow access.
<Directory "/usr/local/tomcat5/webapps/welcome">
Options Multiviews FollowSymLinks
Order allow,deny
Allow from all
AllowOverride All
</Directory>
<Location "/welcome">
Allow from all
</Location>
# Deny access to the running code.
<Directory "/usr/local/tomcat5/webapps/welcome/WEB-INF/">
Order deny,allow
deny from all
</Directory>
<Location "/welcome/WEB-INF/">
deny from all
</Location>
# Deny access to the manifest, etc.
<Directory "/usr/local/tomcat5/webapps/welcome/META-INF/">
Order allow,deny
deny from all
</Directory>
<Location "/welcome/META-INF/">
deny from all
</Location>
AddCharset utf-8 .utf8
AddLanguage en .en
AddHandler type-map var
nps-Apache.conf
The nps-Apache file creates the alias redirect for Novell's iManager on your
OES server. # nps-Apache.conf
# Please include this file in the Apache httpd.conf file
JkMount /nps/*.jsp ajp13
JkMount /nps/servlet/* ajp13
JkMount /nps/portal/services/* ajp13
Alias /nps "/usr/local/tomcat5/webapps/nps"
#<Directory "/usr/local/tomcat5/webapps">
# Options +FollowSymLinks
#</Directory>
# In general, allow access.
<Directory "/usr/local/tomcat5/webapps/nps">
Options MultiViews FollowSymLinks
Order allow,deny
Allow from all
AllowOverride All
</Directory>
<Location "/nps">
Allow from all
</Location>
# Deny access to the running code.
<Directory "/usr/local/tomcat5/webapps/nps/WEB-INF/">
Order allow,deny
deny from all
</Directory>
<Location "/nps/WEB-INF/">
deny from all
</Location>
# Deny access to the manifest, etc.
<Directory "/usr/local/tomcat5/webapps/nps/META-INF/">
Order allow,deny
deny from all
</Directory>
<Location "/nps/META-INF/">
deny from all
</Location>
vo-Apache.conf
As you may have guessed, this file will create the alias redirect for
Novell's Virtual Office on your OES server. # vo-Apache.conf
# Please include this file in the Apache httpd.conf file
JkMount /vo/*.jsp ajp13
JkMount /vo/servlet/* ajp13
JkMount /vo/portal/services/* ajp13
Alias /vo "/usr/local/tomcat5/webapps/vo"
# In general, allow access.
<Directory "/usr/local/tomcat5/webapps/vo">
Options MultiViews
Order allow,deny
Allow from all
AllowOverride All
</Directory>
<Location "/vo">
Allow from all
</Location>
# Deny access to the running code.
<Directory "/usr/local/tomcat5/webapps/vo/WEB-INF/">
Order allow,deny
deny from all
</Directory>
<Location "/vo/WEB-INF/">
deny from all
</Location>
# Deny access to the manifest, etc.
<Directory "/usr/local/tomcat5/webapps/vo/META-INF/">
Order allow,deny
deny from all
</Directory>
<Location "/vo/META-INF/">
deny from all
</Location>
Once you have created these files you have successfully configured Apache.
Next up is to configure a few files for Tomcat.
Configuration - Tomcat 5.5.17
There are four files that we need to configure for our Tomcat setup.
Catalina.sh, server.xml, workers.properties and tomcat_users.xml.
catalina.sh This is the script that is responsible for
starting/stopping the Tomcat server. It sets all the environmental variables.
Using your text editor, open and modify
/usr/local/tomcat5/bin/Catalina.sh. Again, this is a truncated example of
the changes that you will need to modify. Items highlighted in bold are
things you need to enter based on your server environment. #!/bin/sh
# -----------------------------------------------------------------------------
# Start/Stop Script for the CATALINA Server
#
# Environment Variable Prequisites
#
# CATALINA_HOME May point at your Catalina "build" directory.
CATALINA_HOME=/usr/local/tomcat5
#
# CATALINA_BASE (Optional) Base directory for resolving dynamic portions
# of a Catalina installation. If not present, resolves to
# the same directory that CATALINA_HOME points to.
#
# CATALINA_OPTS (Optional) Java runtime options used when the "start",
# "stop", or "run" command is executed.
# What user should run Catalina
CATALINA_USER="nobody"
CATALINA_GROUP="nobody"
#
# CATALINA_TMPDIR (Optional) Directory path location of temporary directory
# the JVM should use (java.io.tmpdir). Defaults to
# $CATALINA_BASE/temp.
#
# JAVA_HOME Must point at your Java Development Kit installation.
# Required to run the with the "debug" or "javac" argument.
JAVA_HOME=/usr/lib/SunJava2-1.4.2
#
# JRE_HOME Must point at your Java Development Kit installation.
# Defaults to JAVA_HOME if empty.
JRE_HOME=/usr/lib/SunJava2-1.4.2/jre
#
# JAVA_OPTS (Optional) Java runtime options used when the "start",
# "stop", or "run" command is executed.
# Adjusts available memory for use with JAVA
JAVA_OPTS="-Xmx256M -Xss512k"
#
# JPDA_TRANSPORT (Optional) JPDA transport used when the "jpda start"
# command is executed. The default is "dt_socket".
#
# JPDA_ADDRESS (Optional) Java runtime options used when the "jpda start"
# command is executed. The default is 8000.
#
# JSSE_HOME (Optional) May point at your Java Secure Sockets Extension
# (JSSE) installation, whose JAR files will be added to the
# system class path used to start Tomcat.
#
# CATALINA_PID (Optional) Path of the file which should contains the pid
# of catalina startup java process, when start (fork) is used
#
# If you wish to further customize your tomcat environment, put your own definitions here
# (i.e. LD_LIBRARY_PATH for some jdbc drivers). Just do not forget to export them :)
#
LD_LIBRARY_PATH=/usr/lib
LD_LIBRARY_PATH=/opt/novell/iManager/lib:$LD_LIBRARY_PATH
LD_LIBRARY_PATH=/var/opt/novell/iManager/lib:$LD_LIBRARY_PATH
export LD_LIBRARY_PATH
#
if [ -x $JAVA_HOME/jre/lib/i386/libjsig.so ]; then
export LD_PRELOAD=$JAVA_HOME/jre/lib/i386/libjsig.so
fi
#
# $Id: catalina.sh 394120 2006-04-14 15:25:07Z yoavs $
# -----------------------------------------------------------------------------
Two aspects about Catalina. You may or may not need to add the JAVA_OPTS
Xmx256M comment. The test server in use was near capacity on memory demands
and I found I needed to specifically allocate memory settings. You may or may
not have to do this depending on your hardware. You'll notice at the end
comments are added as well as an LD_LIBRARY_PATH export. This is
necessary for iManager to know where to pull resources when you attempt to
access it using your new Tomcat 5.5.17 setup. Note! If you do not add and
export you get the classic iManager error where you are presented with a login
screen but after authenticating it renders a blank screen.
server.xml
The server file looks more complicated than it actually is. It basically
configures Tomcat to listen on ports for requests and tells it how to handle
these requests. Items in bold need to be configured in
/usr/local/tomcat5/conf/server.xml. You will notice that I have changed
my connector port to 11009 (which is also reflected in
workers.properties). There are two reasons I modified the port would
connect on. First, Remote Manager redirects to port 8009. I didn't want a
conflict between applications. The second was I am experimenting with setting up
load balancing using two instances of Tomcat on one server. You can set your
connector to whatever desired non-conflicting port. <!-- Define a non-SSL HTTP/1.1 Connector on port 8080 -->
<Connector port="8080" maxHttpHeaderSize="8192"
maxThreads="150" minSpareThreads="25" maxSpareThreads="75"
enableLookups="false" redirectPort="8443" acceptCount="100"
connectionTimeout="20000" disableUploadTimeout="true"/>
<!-- Note : To disable connection timeouts, set connectionTimeout value
to 0 -->
<!-- Note : To use gzip compression you could set the following properties :
compression="on"
compressionMinSize="2048"
noCompressionUserAgents="gozilla, traviata"
compressableMimeType="text/html,text/xml"
-->
<!-- Define a SSL HTTP/1.1 Connector on port 8443 -->
<Connector port="8443" maxHttpHeaderSize="8192"
maxThreads="150" minSpareThreads="25" maxSpareThreads="75"
enableLookups="false" disableUploadTimeout="true"
acceptCount="100" scheme="https" secure="true"
clientAuth="false" sslProtocol="TLS" />
<!-- Define an AJP 1.3 Connector on port 8009 -->
<Connector port="11009"
enableLookups="false" redirectPort="8443" protocol="AJP/1.3" />
<!-- An Engine represents the entry point (within Catalina) that processes
every request. The Engine implementation for Tomcat stand alone
analyzes the HTTP headers included with the request, and passes them
on to the appropriate Host (virtual host). -->
<!-- You should set jvmRoute to support load-balancing via AJP ie :
<Engine name="Standalone" defaultHost="localhost" jvmRoute="ajp13">
-->
workers.properties
This file, although small, is essential for proper Tomcatting. A worker is
the actual go between for requests made to the web server for a servlet. When
Tomcat hears the request for an application it is the worker that handles the
execution of the servlet. If you remember from our Apache configuration we had
created the Jakarta module that included the location of
workers.properties. All that is needed is to create this file and save it
into /usr/local/apache2/conf/. #
# Tomcat 5.5.17 workers properties
#
# In Unix, we use forward slashes:
ps=/
# List the workers by name:
worker.list=ajp13
workers.tomcat_home=/usr/local/tomcat5
workers.java_home=/usr/lib/SunJava2-1.4.2
# Tomcat instance using ajpv13 protocol
worker.ajp13.port=11009
worker.ajp13.host=localhost
worker.ajp13.type=ajp13
tomcat_users.xml
This file is not necessary for the implementation of Apache 2.2.2 and Tomcat
5.5.17. Depending upon your security policies, whether you are an
uber-administrator or just curious, you may or may want to use it. This file
will set permission levels to access the Tomcat server management from <ip
address of server>:8080. If you chose to comment out the access in your
server.xml file then this file is moot. I included it in this article
because I used Tomcat's manager to monitor and test applications and my test
server was in a self-contained isolated lab network. You can customize it to
your needs and save it in /usr/local/tomcat/conf/. I added an
administrator account. If you do choose to use this file I highly suggest you
make sure that root owns the file and group as well as execute chmod 600
on the file as it stores passwords in clear text. <?xml version='1.0' encoding='utf-8'?>
<tomcat-users>
<role rolename="tomcat"/>
<role rolename="role1"/>
<role rolename="manager"/>
<user username="tomcat" password="tomcat" roles="tomcat"/>
<user username="role1" password="tomcat" roles="role1"/>
<user username="both" password="tomcat" roles="tomcat,role1"/>
<user username="admin" password="<insert your password>" roles="manager"/>
</tomcat-users>
There is only one more thing to modify. The goal when I started out was to
install the latest versions of Apache and Tomcat and integrate their use with
the current setup of our Novell OES (SUSE) server. It was not desired to have to
edit XML, HTML and other conf files to achieve a successful implementation.
Rather, I wanted to substitute the new install for the old and leave the rest of
the server setup alone. To accomplish this you will need to create soft links
inside your Tomcat 5 directory to point back to your existing webapps.
Do this by changing into the /usr/local/tomcat5/webapps and issue the
following commands: # ln -s /var/opt/novell/tomcat4/webapps/nps nps
# ln -s /var/opt/novell/tomcat4/webapps/vo vo
# ln -s /var/opt/novell/tomcat4/webapps/welcome welcome
Congratulations are again in order as you have just completed the
installation and configuration of Apache 2.2.2 and Tomcat 5.5.17! Now it is time
to test our work and see the results.
Testing
Start services
Since this is a default load of Novell OES SP2 Tomcat 4.1.31 and Apache
2.0.49 are installed with a start script in /etc/init.d/ that starts the
service upon a successful boot. If these are currently running stop them now by
executing: # /etc/init.d/novell-tomcat4 stop
# /etc/init.d/apache2 stop
Next it is time to start our new services for testing. Always start Tomcat
first. When you start Tomcat you will be presented with some dialogue, which is
presented below the command. Apache will return nothing if it was
successful. # /usr/local/tomcat5/bin/catalina.sh start
Using CATALINA_BASE: /usr/local/tomcat5
Using CATALINA_HOME: /usr/local/tomcat5
Using CATALINA_TMPDIR: /usr/local/tomcat5/temp
Using JRE_HOME: /usr/lib/SunJava2-1.4.2/jre
# /usr/local/apache2/bin/apachectl start
Apache 2.2.2
Open up a browser of choice and enter http://<ip address of
server>. You should be presented with the default Apache index page:
 (Figure 1 - Apache default web page running) Tomcat 5.5.17
Next let's check Tomcat by entering http://<ip address of
server>:8080. You should find yourself looking into the face of a tiger
that drank sour milk.
 (Figure 2 - Tomcat 5.5.17 default web page running) If you configured the tomcat_users.xml file you can click on "Tomcat
Manager" under the administration block and enter your username/password to
access the administrator's web page. See Figure 3 for a screenshot of the
backend.
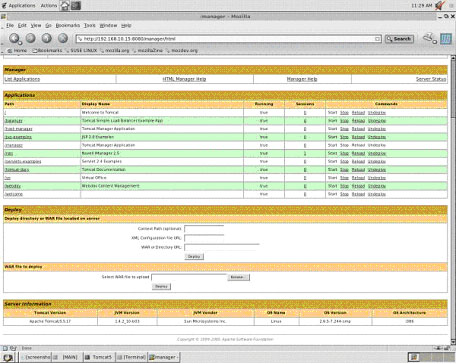 (Figure 3 - Administration page of Tomcat 5.5.17) Now that we have confirmed that both services are running we can check to see
if we are able to access Remote Manager, Welcome Page, iManager and Virtual
Office.
Remote Manager
To confirm we still have Remote Manager capability with our server enter
http://< ip address of server>:8008. It should redirect over to
https on port 8009 automatically and you will be presented with Figure 4.
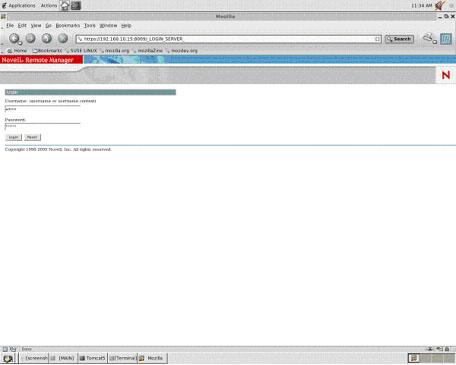 (Figure 4 - Remote Manager login screen) Log in and you will see Figure 5.
 (Figure 5 - Remote Manager home page) Welcome Page
Although the Welcome Page is not a necessity, since we set it up it is a good
test for the installs because it uses a mixture of java and html. Go ahead and
access the Welcome Page using your alias: http://<ip address of
server>/welcome (see Figure 6)
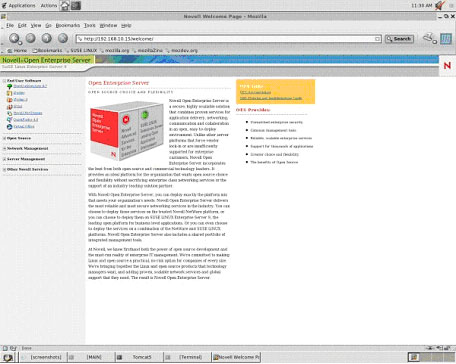 (Figure 6 - Welcome Page) iManager
Access iManager via the alias redirect you built in nps-Apache.conf by
entering: http://<ip address of server>/nps. Depending upon your
server's process and memory it may take a second or two to call up, however your
browser should reveal a login screen (see Figure 7).
 (Figure 7 - Novell iManager login portal) To test if your library was exported correctly from catalina.sh, login
and reveal Figure 8.
 (Figure 8 - Novell iManager main screen) Virtual Office
Virtual Office access is very similar to iManager. Enter http://<ip
address of server>/vo in the address bar. You will be presented with the
login portal (Figure 9) and upon access with your credentials you will find
yourself on the home page (Figure 10).
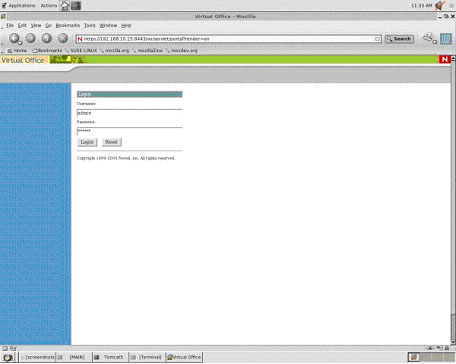 (Figure 9 - Virtual Office login portal)
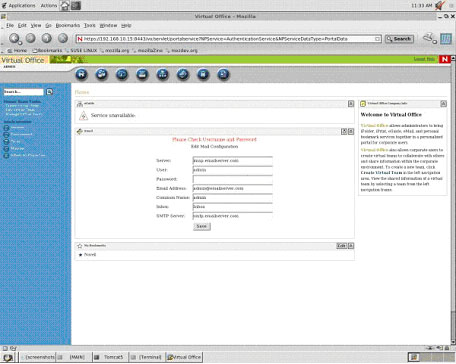 (Figure 10 - Virtual Office home page) For those with eagle eyes you will see I have a message of "service
unavailable" on the home page of Virtual Office. It is referencing eGuide which
was not installed on my test server so that error was expected.
Post-Install and Afterthoughts
Congratulations?your server is now configured with a basic install of Apache
2.2.2 and Tomcat 5.5.17 utilizing Sun Java2 1.4.2!
If you intend to migrate your system to the new install of Apache and Tomcat
you should go ahead and modify the /etc/init.d scripts to no longer reference
and start the older Tomcat4 and Apache services. It is good practice to not just
delete the older services in case you find production applications that for one
reason or another are not supported by the latest and greatest install that you
just performed. Leave the older versions intact and in place until you are
satisfied that your system is stable. A good way to accomplish this is to use
chkconfig to turn off the older services in all runlevels and then add
your new ones to runlevel 3 and 5. No other major thoughts?hopefully this guide
is more of a help then a hindrance and your install went smoothly.
| 


